Plantation shutters are a great way to bring style and sophistication into any home. They look beautiful, creating an atmosphere of warmth and comfort that can’t be found with other window treatments. But for many homeowners, the thought of installing plantation shutters themselves seems overwhelming. Not anymore! Installing plantation shutters isn’t as daunting as it may seem – I’m here to show you how easy it is!
In this article, we’ll walk through each step of the installation process in detail so you can feel confident tackling your own project. From measuring your windows properly to hanging the finished product on the wall, I’ve got all the tips and tricks you need to get through the job successfully. You’ll also learn what supplies and tools you’ll need ahead of time so there won’t be any surprises when it’s time to start putting everything together.
By following my advice, you’ll have stylish new shutters up in no time – read on for more information about how to install plantation shutters like a pro!
Selecting The Right Shutters For Your Home
Now that you have a better idea of what type of plantation shutters to buy for your home, it’s time to start the selection process. Whether you’re looking for new shutters or DIY shutter kits, there are plenty of options available in various materials and colors. Before you make your final decision, consider the look and feel you want to achieve with your window treatments as well as any additional features such as adjustable louvers or hidden tilt rods. Additionally, research different manufacturers to find the best price-quality ratio before committing to one brand.
It’s also important to factor in installation costs when selecting the right plantation shutters for your home; if you plan on doing this project yourself, be sure to budget enough money for necessary tools and supplies. If not, then contact local professionals who can provide an accurate estimate based on labor hours required and material cost.
No matter which option is best for your situation, choosing the right plantation shutters will add beauty and value to your home while providing light control and privacy benefits that last over time.
Tools Needed For Installation
Before you begin installing your plantation shutters, make sure you have the right tools for the job. You’ll need a drill with a bit that matches the size of screws provided and a spirit level to check if each shutter is properly aligned. If you plan on mounting your shutters inside the window frames, you may also want to get some toggle bolts as well.
Once all the necessary tools are gathered, it’s time to start preparing for installation. Make sure there’s enough space around windows to accommodate both open and closed shutters; measure twice before cutting any wood or drilling holes into walls or frames. Also, keep in mind that most kits come with detailed instructions so be sure to read them thoroughly beforehand.
Finally, double-check everything again before starting installation. Confirm measurements are correct and always use safety equipment when using power tools – such as goggles or ear protection – especially if working at height where additional precautions should be taken. With these steps completed, you’re ready to get started on transforming your home with beautiful new plantation shutters!
Step-By-Step Guide To Installing Plantation Shutters
Installing plantation shutters is a great way to upgrade the look of your home, and it’s easier than you might think. With a few simple steps and the right tools, you can learn how to install plantation shutters like a pro! Here are four easy steps for installing them:
- Measure twice, cut once – begin by measuring the width, height, and depth of each window frame in order to get accurate measurements. Make sure you measure from wall-to-wall or inside-the-frame so that your new shutter frames will fit perfectly when installed; mark these points on your walls before drilling holes into them.
- Attach the shutter frames – use screws provided with each kit to secure the shutter frames into place. If mounting within window frames, toggle bolts may be necessary as well; double check that all connections are tight and level using a spirit level.
- Hang your shutter panels – take one panel at a time and slide it securely onto its track or rod system until it locks into place. Ensure that all panels move freely without obstruction before proceeding further. Then attach any additional decorative elements such as pulls or tilt rods according to instructions.
- Adjust & enjoy – test out different positions of your plantation shutters, adjusting their angles until they meet your desired light control needs while still looking aesthetically pleasing. Once everything looks good, step back, admire your handiwork and enjoy all the benefits of having beautiful custom-made plantation shutters in your home!
Preparing The Window Frames
Now that you know the basics of installing plantation shutters, it’s time to prepare your window frames for the job at hand. Before you start drilling holes and attaching hardware into walls or window frames, there are a few things you should do first in order to ensure a successful installation.
First, remove any existing trim around the windows; this will give you more room to work with when installing new shutter frames. If mounting within window frames, use an awl or small drill bit to make pilot holes so that screws can fit snugly against the wall without damaging it. Finally, be sure to clean off dust and debris from inside and outside your window frame using a vacuum cleaner before proceeding further. Doing this now will save you lots of trouble later on!
Once everything is prepped properly, you’ll be ready to move onto measuring and marking exactly where your plantation shutters need to go.
Measuring And Marking The Window Frames
Now that your window frames are prepped and ready to go, it’s time to measure and mark exactly where the plantation shutters need to fit. Before you begin installation, make sure you have all of the necessary tools on hand: a measuring tape, pencils and hinge pins for connecting between each panel.
Start by measuring the width of your windows from edge to edge; this will give you an idea of how many shutter panels you’ll need and whether or not they will be full length or cut down depending on window size. Once measurements are taken, use a pencil to mark where hinges should attach at either end of each panel as well as in-between them if needed. If mounting within existing window frames, double check that pre-drilled holes line up perfectly with markings before proceeding further.
With everything marked off correctly, it’s time to secure the frame into the window using fasteners such as screws or nails. Depending on what type of material your window frame is made out of (wooden, plasterboard etc.), choose the appropriate fastener for best results – but always remember safety first!
Securing The Frame With Fasteners
Now it’s time to secure the frame into the window using fasteners. Start at the top of the frame, attaching a panel first and working your way down to ensure everything is even. If needed, use hinge pins in between panels for extra support before inserting screws or nails into pre-drilled holes. Make sure you have all of the necessary tools on hand such as a power drill with appropriate bit size (depending on fastener type), screwdriver, hammer and level – but always remember safety first!
When all of the frames are attached securely, check that each shutter panel lines up evenly with the other and adjust if need be. As an added precaution, double check measurements against original pencil markings made earlier just to make sure they’re still accurate. Once satisfied with placement and alignment, insert screws through predrilled holes until fully tightened – this will help keep shutters firmly in place during operation.
Drilling Holes For Mounting Brackets
Now that you’ve secured the frame, it’s time to drill holes for mounting brackets. This is a crucial step and should be done with caution as incorrect placement of your bracket can cause an imbalance in shutters when open or closed. As the saying goes “measure twice, cut once” – make sure you understand where your measurements are before drilling!
To begin, use your drill to pre-drill guide pilot holes into window jamb and sill after double checking all measurements. You may need additional tools such as a hammer and chisel depending on material being used (wood or vinyl). Once finished with this step, insert screws through predrilled holes until fully tightened ensuring each mount is flush against surface.
Finally, adjust any necessary hardware components like hinges while making sure they are level and secure. If needed, add extra support by using hinge pins between panels and tighten accordingly. With the hard part out of the way, you’re ready to move onto fitting and adjusting the louvers!
Fitting And Adjusting The Louvers
With the mounting brackets securely in place, it’s time to fit and adjust the louvers. You should start by opening shutters up so you can access each panel from inside mount or L frame area (depending on your specific shutter type). We recommend using a leveler to make sure everything is straight before moving forward with installation.
Once panels are properly aligned, begin inserting tilting rods into backside of louver, using small flathead screwdriver if necessary. Make sure they slide through holes easily without too much resistance – this will help avoid any unnecessary damage when adjusting panels as needed later down the line. After all tilt rods are secured, go ahead and insert valances into opposite side of louver for added aesthetic appeal.
Now that your plantation shutters have been installed and adjusted, you’ll be able to open and close them with ease! To do this, just pull on either end of rod until desired position has been reached – simple as that! With these tips in mind, you’re ready to move onto installing tilt rods and valances.
Installing Tilt Rods And Valances
Now that the louvers and mounting brackets are in place, it’s time to install tilt rods and valances. This step is especially important for creating a seamless look with your plantation shutters – but don’t worry, it’s easy! According to statistics from DIY Network, more than 90% of people who’ve installed their own shutters find this process straightforward. Here’s what you need to know:
1) Start by locating the top left and right screws on each panel. Then use a drill or screwdriver to secure them into place.
2) Next, insert tilt rods through backside of louver using small flathead screwdrivers if necessary. Make sure they slide through holes easily without too much resistance – this will help avoid any unnecessary damage when adjusting panels later down the line.
3) Finally, go ahead and insert valances into opposite side of louver for added aesthetic appeal. Once the valves have been secured in place, your plantation shutters should be ready for use!
With these steps complete, you’re now ready to add some finishing touches on your shutters before enjoying them fully in your home.
Finishing Touches On Your Shutters
With the installation of tilt rods and valances now complete, it’s time to add some finishing touches. These will help elevate your plantation shutters by blocking out light and creating a more uniform look. Here are some steps you’ll want to take:
- First, close the panel completely so that louvers align with each other when viewed from the side. This will help block out any unwanted light while giving your room a sleek appearance.
- To make sure everything is aligned correctly, hold up the frame against a straight edge or wall surface at eye level – then check for any gaps or misalignments between panels. If there’s an issue here, simply adjust screws until everything lines up evenly again!
- Finally, use special paint or stain on shutter frames if desired to give them extra protection from weather elements and enhance their aesthetic appeal even further.
These small details can really bring life to your new shutters – but what happens if something goes wrong during installation? Read on for troubleshooting tips for common issues you may encounter along the way…
Troubleshooting Tips For Installation Issues
Sometimes things don’t go as planned during shutter installation, and that’s okay! Here are some troubleshooting tips to help you get back on track:
- Check the Shutter Frame: Make sure your frame is secure by ensuring all screws have been tightened properly. If there’s a gap around the edges of the shutter, use silicone caulk or weatherstripping foam to fill in any voids.
- Adjust Valances: If the valance isn’t sitting flush against the wall or window casing, loosen up its mounting screws slightly then try re-installing it again using new ones if necessary.
- Look for Any Loose Parts: Double check that all parts – including tilt rods, hinges and louvers – are securely fastened before moving onto the next step. This can save time later on down the line when attempting to fix any issues with them!
- Test Out Your Shutters: Once everything looks good from an aesthetic perspective, make sure they operate correctly by opening/closing panels and adjusting tilt settings accordingly.
If these steps haven’t helped resolve your issue(s), it may be best to contact a professional installer for assistance rather than attempting a DIY solution – which we’ll cover more in detail below…
Professional Vs Diy Installation Services
It’s easy to get caught up in the excitement of installing plantation shutters yourself, but it may not always be the best choice. After all, a professional installation service can save you time and money – not to mention potential headaches from DIY mishaps!
On one hand, if you’re confident with the materials and techniques for attaching the frame and adjusting valances, then going the DIY route is certainly an option. But on the other hand, there are some advantages to hiring a pro that could make it worth your while: they’ll have access to more specialized tools; their expertise will ensure your shutters are properly installed and functioning correctly; and most importantly, they’ll guarantee satisfaction with their work so you won’t have any regrets down the road.
No matter which way you decide to go when installing plantation shutters, there’s no wrong answer as long as you end up satisfied with the results! With careful forethought into what works best for you and your budget, you’ll be able to confidently move forward towards achieving the perfect window treatments for your home.
Frequently Asked Questions
What Is The Best Material For Plantation Shutters?
When it comes to plantation shutters, there are so many options for materials. But which one is the best? The answer may depend on your personal preference and what you’re looking to get out of them. To help you decide, let’s take a look at some common materials used in plantation shutters.
Wood is probably the most popular material when it comes to plantation shutters. It’s attractive, durable and easy to customize with stains or paint colors that match any home decor style. Plus, wood can be cut into any shape you want, giving you lots of flexibility for installation and design. On top of that, wood is naturally insulating – perfect if you’re trying to keep your rooms cool during hot summer months!
Vinyl is another great option when it comes to plantation shutters. Vinyl offers an economical solution as well as being light weight and low maintenance – no need for painting or staining! Additionally, vinyl has excellent durability in extreme temperatures compared to other materials, making it ideal for areas prone to temperature swings like garages or attics. And because they come in a variety of colors and finishes, vinyl can easily fit with any existing décor without sacrificing beauty or function.
No matter what type of plantation shutter material you choose, make sure it fits both your budget and needs while also complementing your home’s overall aesthetic and design scheme. With all these factors considered, you’ll end up with the perfect combination of form and function!
How Much Will It Cost To Buy And Install Plantation Shutters?
Are you considering getting plantation shutters for your home? You’ve probably already thought about the material, but have you considered how much they might cost to buy and install? It’s an important factor in deciding if plantation shutters are right for you.
The amount of money it will take to get plantation shutters can vary significantly depending on a variety of factors like size, quality, and installation costs. The price of the materials themselves range from around $20-$30 per square foot all the way up to $100 or more per square foot. If you don’t want to do the work yourself, then professional installation is going to be another expense that could add several hundred dollars more onto the total cost.
All in all, what you end up spending really depends on what kind of plantation shutter best suits your needs – both aesthetically and financially. Being mindful of these details before making a purchase can help ensure that you make an informed decision when buying plantation shutters for your home.
Are Plantation Shutters Easy To Clean?
Polishing plantation shutters: is it possible? Many homeowners wonder if they can clean these window treatments with ease. After all, nobody wants to waste hours of scrubbing and wiping away dust and dirt just to keep their windows looking pristine! But the good news is that cleaning your plantation shutters doesn’t have to be a chore – in fact, depending on the material used for construction, you may find that they’re surprisingly easy to maintain.
When considering whether plantation shutters are easy to keep sparkling clean, start by examining the materials used. If you’ve chosen vinyl or faux wood blinds, then regular dusting will suffice; however, if you’ve opted for real wooden frames, then more frequent deep cleans might be necessary. Wooden surfaces require an oil-based cleaner in order to stay shiny without scratching the surface; for this reason, many people opt for faux wood options instead as they don’t need any special care or treatment.
Whichever type of shutter you choose, there’s one thing all owners should do regularly: inspect the frame and louvers for signs of damage from weather or wear and tear. It’s important to check hinges and slats often so you can identify any problems early on – fixing minor damages now could save having to replace whole sections later down the line! Ultimately, no matter what material your plantation shutters are made out of, keeping them well maintained will ensure they look beautiful and last longer too.
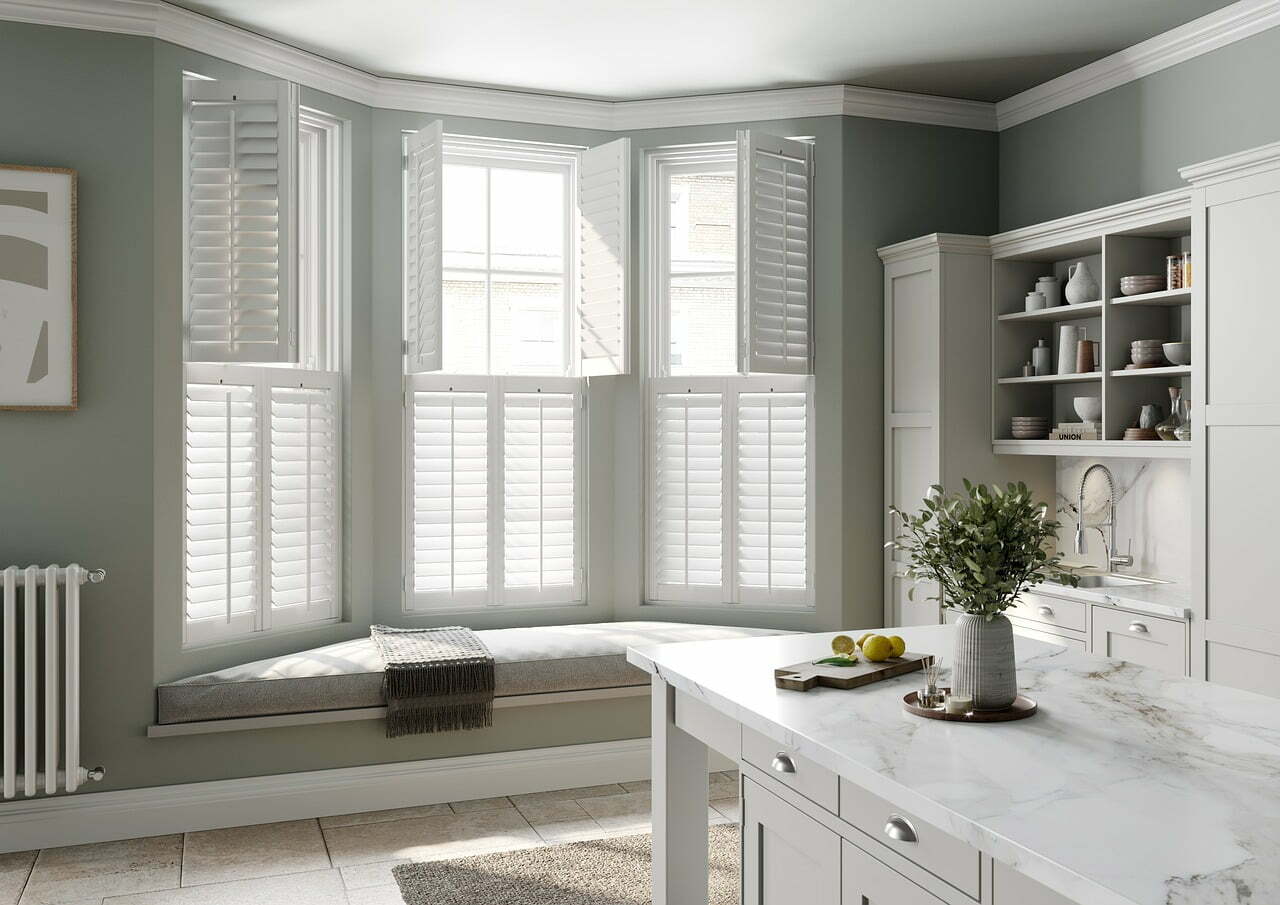
Can Plantation Shutters Be Used On Bay Windows?
So, can plantation shutters be used on bay windows? Absolutely! Plantation shutters are a great option for bay windows because they offer plenty of flexibility. Here’s what you need to know before installing them:
- They come with multiple louvers that give you the ability to open and close your window while controlling how much sunlight enters the room.
- You can customize the shutter size to fit any type of bay window shape or size.
- The panels are removable, so you don’t have to worry about permanently affixing anything in place.
- • Shutters provide an extra layer of insulation from outside temperatures and noise.
- • With regular cleaning and maintenance, these shutters will last for years without needing replacement.
Installing plantation shutters is not difficult but does require some preparation and careful measuring. Once all measurements have been taken, it’s important to make sure your chosen material is suitable for use on bay windows—many materials may not bend correctly around curves or corners. It’s also important to ensure that your hardware is strong enough to support the weight of the material when opened or closed fully; if not done properly, it could cause damage over time. Finally, depending on where the installation takes place (inside mount vs outside mount), there may be additional steps needed such as cutting down frames or trimming edges to fit perfectly within your space.
When installed properly, plantation shutters transform a home by adding beauty and practicality simultaneously – making them an ideal choice for bay windows in any home!
Are Plantation Shutters Energy-Efficient?
If you’re looking for the perfect window treatment, it doesn’t get any more beautiful than plantation shutters. Not only are the stunningly gorgeous, but they also provide energy-efficiency that is truly out of this world! Are plantation shutters really as efficient as everyone says? Absolutely! Here’s why:
The benefits of plantation shutters when it comes to energy efficiency are almost too good to be true. For starters, they help keep your home cool in the summer and warm in the winter by regulating temperatures inside your home – something no other type of window covering can do. Additionally, they block up to 97% of UV rays from entering your house and protect you from harmful glares while still allowing natural light into your space. Finally, with adjustable louvers you can control how much air enters or escapes a room based on what season it is – making them an all-in-one solution for reducing energy costs.
Here’s a bullet list summarizing some of the amazing features of plantation shutters:
• Keeps homes cooler & warmer
• Blocks up to 97% of UV Rays
• Adjustable Louvres for optimal air flow
Plantation Shutters may just be one of nature’s best kept secrets; providing not just beauty but unparalleled energy efficiency at an affordable price point. They’re ideal for those who want a stylish addition to their windows without sacrificing functionality or budget constraints. If you’re ready to take advantage of these incredible benefits then consider installing plantation shutters today!
Conclusion
The beauty of plantation shutters is undeniable. Whether you choose wood, composite or vinyl material for your shutters, you will be able to enjoy their timeless look and practical features in your home for years to come. The cost of buying and installing plantation shutters may seem high at first glance but the energy savings alone make them a wise investment over time. Plus, they are easy to clean and can be used on bay windows too!
Plantation shutters offer so much more than just good looks; they provide an added layer of insulation that can help keep your house cooler in summer and warmer in winter. This helps reduce your carbon footprint while saving money on utility bills. So why not invest in some stylish plantation shutters today? They will add both charm and value to your home while helping protect the environment at the same time.
When it comes down to it, there’s no denying what makes plantation shutters such a great choice – they’re beautiful, efficient, eco-friendly, long lasting… need we say more? From their classic style to their superior performance benefits, these window treatments are sure to give any room in your home a refined touch that won’t go out of style anytime soon.